Wednesday 9 December 2009

Virtual Environments - Final Thoughts

So, what did I think of this module as a whole? While I wasn't too keen on the 3D head assignment, I did learn many interesting modelling techniques, and I learnt a new but complicated method of applying materials, but compared to other 3D based assignments, and although the finished product was good enough to get me a high mark, I still enjoyed working on the other assignments more.

The group project I had a bit more fun with - my team was great to work with, and the end result of that assignment personally impressed me more than the 3D head. Despite the final outcome of this group project being very good, I would still like the opportunity to do something like this again, but unfortunately (at least, as far as I'm aware), this could very well be the last time I work with 3D Modelling for University related assignments.

Although I had previously dreaded each upcoming assignment, I always ended up having fun with 3DS Max anyway, learning new skills which may greatly help me with whatever career path I eventually choose. It's a shame I probably won't be doing anymore 3D University work, but all I can say is that it's been a blast. Until next time...

Group Project Part 6 - Reflection

At time of writing, we don't present our work to the client until tommorow, but I may as well post my final thoughts regarding this group project now, since we have essentially finished all of our work.

As soon as I found out that there was to be a group project for this module, I initially felt very cynical towards this particular assignment, as in my first two years at University, in all the previous group assignments I have done, I've either had the majority of the workload dumped onto me, or I wasn't given enough work to do, or found that the rest of my group wasn't taking the work seriously enough - however, this time around neither of these situations occured, and this was perhaps one of if not the best group I have ever been a part of. For the first time in any group project I've been involved in, everybody really pulled their weight and the final result from all four of us was very pleasing, and really goes to show how much effort we all put in together.

I'll make comments about the things I have learnt later on in this entry, but first of all is a shout out to the other three members of the group:

Craig seemed to take on a front-man role right from the very start: of all the original three members of the group (myself, Craig and Ryan), he seemed to have the best communication skills. Not only did he provide very detailed modelling skills for his left side of the machine, but he also provided us with all the information that the rest of us needed, such as how the machine works, as well as the photos that were taken of the boiler pump which we all used as references for our modelling. As well as this, he also consistently provided the rest of us with very helpful constructive feedback.

Ryan appeared to have some fun working with fire in 3DS Max, and his right side of the machine, despite being started on fairly late into the project, also turned out to look very good, and like Craig, his representation of his part of the machine was very much like its real life counterpart. He also went out of his way to add extra detail such as the text at the top of the machine, and the way he connected the machine to a stove-like object was a nice touch. Sadly, while not his fault at all, and despite how good it initially looked, we couldn't even use the flame he made because of a technical error that I mentioned in a previous entry, which turned it blue for no apparent reason, so I had to recycle a flame I had made in an earlier project instead. I feel he did a great job with his part, and he even aided me with the camera positioning in the final video, however it was a shame to see his fire go to waste.

Adam, the late addition to our group, initially did not seem to be able to contribute much, but for understandable reasons. However, within the last few weeks he really started to pull his weight, taking time out of his incredibly busy schedule to provide us with with an excellent and suitable environment, a boiler room, for the machine. And for the final video to be used when presenting to the client, he also provided a very suitable voiceover. It was all thanks to his additional help that we went from being The Little Group That Could, to being able to produce some very impressive work in the end.

As for myself, I was initially handed the task of animating anything that required it, since both Craig and Ryan were very impressed with my skills from a previous assignment. I was more than happy to take up this role, being given the middle piece of the machine which so happened to be the only part that required animation. While my model wasn't completely accurate when compared to the middle part of the real machine, I feel that it still looked pretty good in the end, and it shows how far my modelling skills have developed over the past year and a half. For this project I also learned to use bump mapping for the first time, which really helped to give our models quite a realistic paint-like texture.


As far as this group went, we hardly ever came across any real problems: there were no argumanets over things going wrong, and we happily worked together towards our goal of completing this assignment. Overall, I thoroughly enjoyed working as part of this team, and I'm very satisfied with both our final result, and the skills I've learnt from this module, including new modelling techniques, and teamwork skills - and this project, along with another recent one, has enabled me to develop a much more positive attitude towards team-based assignments.

Monday 7 December 2009

Group Project Part 5 - Final Scene

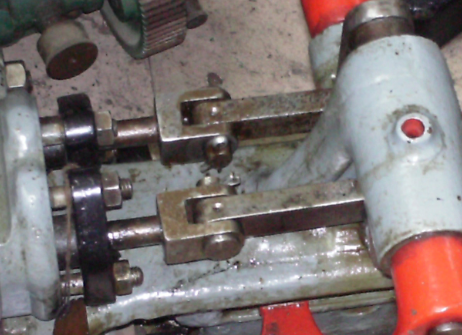
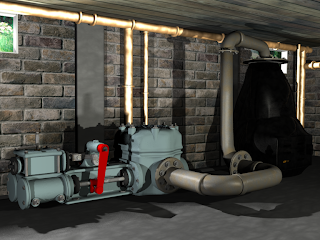
Steven here, with our complete boiler pump finally placed into Adam's environment. Before I go into any detail, here's a screengrab of the final animation frame:


We spent our most recent meeting putting the boiler pump together, and then placed it into the environment. We also placed a camera into the scene, which moves around to give the viewer a better view of the envoronment, and most importantly the boiler pump as a whole.

Because I've been using the most recent version of 3DS Max, and since my middle part of the boiler pump (and presumably the materials too) will not open in earlier versions of the program, I was tasked with rendering the final video.

Before doing so, a number of changes had to be made, not only to shorten the total render time as much as possible, but also because of other technical issues. The aforementioned changes are as follows, with screengrabs.

Firstly, Adam's water tank was removed from the scene:


This was a difficult decision for me to make, since I imagine that along with the environment, Adam spent a fair bit of time getting the tank to look just right, and it fit in with the scene very well. However, once the completed boiler pump was placed into the scene, we initially had difficulty getting it to fit next to where this boiler was placed. It was shrunk, and even moved to the other side of the room, but I later noticed that it got in the way of the camera, so it ultimately had to be hidden. I personally feel that, had we thought more about it, we probably could have found a way for the water tank to connect to and work with the boiler pump.

Secondly, I had to replace Ryan's fire with one of my own.


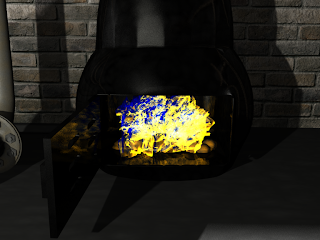
The flame does look very good, but a problem that Ryan discovered early on was that, when a light source is included in the scene with this fire, it for some reasons colours some of it blue. While blue is the inverted colour of yellow, we had been scratching our heads as to why the flame was even changing to that colour, or rather how or why the light was changing it. With no apparent answer or a way to solve this, my only option (with it being 2am at the time... I just wanted to get the render started and go to bed!) was to replace the flame with one that I made and used for an earlier assignment:


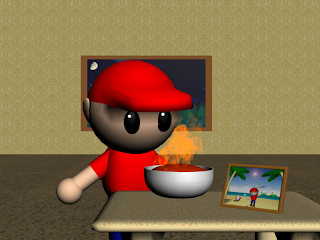
So after bringing in this flame from a 3D Modelling and Animation assignment from last year, I placed it into Ryan's model, resized it as neccesary, and this is how it looks:


It is a bit of a shame that I had to resort to this, because my flame is actually dimmer than Ryan's, and the reflection effect that the previous flame had has now been lost.

Finally, a bump map that Adam applied to the concrete floor had to be removed.


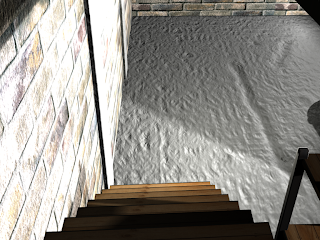
Bump maps take a fair bit of time to render, so with the floor basically being a giant bump map, that would have been one of the contributing factors to a very, very long rendering time. So I simply had to make one small adjustment to the material to get rid of the bump map...


And this is what it now looks like. You can still see that there appears to be some bumps in the floor, so while it now doesn't have a very realistic texture, it still doesn't look too bad, and again reduces rendering time.

So while applying these changes, as well as making minor adjustments to the lighting and shading, I managed to get the total rendering time from 25 hours, up to around 36, and then finally down to a more reasonable 19 hours. I still didn't think my laptop could handle all of that, so I had to do it in four parts, three of which I slept through. The final render, in video form and with all four parts included, is here:


In our next, and most likely final meeting before we present it to the museum staff, we will be making some more changes like possibly adding a voiceover.

Friday 27 November 2009

Group Project Part 4 - Animation

After adding materials and bump mapping to our models, I have now animated the middle piece. There are a couple of minor issues with the render since I had attempted to use Curve Editor to loop the animation, and when it comes to the end it pauses for a brief moment before repeating.

Anyway, here's what we have:

Friday 20 November 2009

Group Project Part 3 - Pieces Coming Together

Steven here, with my middle piece of the boiler pump. I've done a bit more to it, adding more parts as my guesswork alone is teaching me how the machine works, giving me a much clearer idea of how it should be coming together.


This is what it looked like last night, before I started adding more pieces, applying meshsmooth to one or two parts and changing the colours from something you'd see in Toytown to match the appearance of the actual machine:


It's looking much better now, but there are still a few more details I need to add before I start animating the swivels and pistons. Aside from what's lacking at this moment in time, I'm very pleased with how it looks so far.

Craig seems to have finished his left part of the machine, and I think he's done a pretty good job. He's also recoloured it to match the paint job that the boiler pump has, and this is the result:


I have to say that I'm quite impressed with the model as a whole, especially the amount of detail that he's put in.

Now, it's time to bring these two parts together to create two thirds of the boiler pump! So with mine and Craig's modelling powers combined, we have...


...discovered that our models are completely out of scale with each other. We have both been using centimetres as our measuring unit in 3DS Max, but my part is stupidly oversized, whereas Craig has been working with the correct scale of the real life boiler pump. So, it's now time to shrink my piece down to the right size and bring the two together...


Although there are a few minor niggles like overlapping pieces and some colours not quite matching, it's starting to come together quite nicely. Keep a look out for my next entry as I apply finishing touches to my middle piece, and start adding some realistic materials to our models.

Monday 16 November 2009

Group Project Part 2 - Progress So Far

For this group project, my own task involves modelling and animating this particular section of Arthur Mumford's pump, circled in the photo below:


This part features swivels which are seemingly attached to clamps that move a pair of pistons back and forth. And by "seemingly", I mean that I can't clearly tell whether or not they are actually attached just by looking at the photos (I was never able to visit the museum myself, so a lot of guess work has to be done by me). Presumably, the swivels on the sides actually push the clamps attached to the pistons back and forth without actually being attached to them:


Look where the arrow is pointing. The swivel doesn't appear to actually be attached to the clamp, and the part where the arrow points to appears to have had a load of paint scratched off over time. So at the moment, this is the only lead I've got as to how this part works.

Here's what I've modelled so far:


I started out by modelling the main body of this section (the part in gold), which I did by making a box, adjusting the size and number of faces as I needed, and extruding the faces in order to match the proportions of the actual machine. From there I added more shapes for the various parts of the machine, with a bit more work going into the swivels and the clamp holding the pistons.

I will use modifiers to smooth it all out when I feel the time is right, but I want to complete the modelling process fist. There is still one little bit that I'm currently stuck on...


These two joints. And I have no idea how they work or how they move, so it seems that there's plenty of guess work for me to do.

Friday 30 October 2009

Group Project Part 1 - First Meeting

Just days before handing in that dreaded 3D head, my group made up of only three people at the time had our first "official" meeting. We basically looked through the photos that were taken by one of my group members at the museum, and we decided on a machine known only as "Arthur Mumford's Favourite Boiler Feed Pump". No official name, model number or anything like that, all we know that it was apparently Mr Mumford's favourite.


Since I couldn't go to the museum myself, I wasn't able to get too much of a good look at the machine, so it's just as well that Craig took plenty of photos from different angles for me to use as reference images for my part of the machine.

Craig's task as far as modelling goes is to make the left part of the machine, and he will also be gathering any information he can get regarding this machine. He also seems to have something of a leadership role within the group. Ryan will be modelling the right side, and he hopes to be able to work with elements such as fire and water. And finally, since these two have given me good feedback for my animations from last year, I have been given the task of modelling the piece in the middle, the only part which actually needs animating.

I'll go into a bit more detail in my next entry, which will basically be a copy of what I've posted in the group blog.